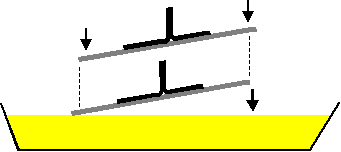
Fig. 1
One of the more frustrating chores when making "homebrew" printed circuit boards is the traditional etching process. Long periods of gently rocking a tray of etchant, having it splash over your fingers and/or the table or of rigging up Rube Goldburg gadgets to rock the tray or bubble air through a tank for you. I would like to introduce to you a little known alternative where physics provides the agitation and you can sit back and catch up on your reading or whatever.
This technique takes advantage of two physical forces, gravity and surface tension. The circuit board is floated, circuit side down, on the top of the etching solution. It floats by virtue of "Surface Tension", a force which resists distortion of a liquid surface by a heavy object placed on it. As long as the back of the circuit board remains dry, the board will float. Gravity plays a role by virtue of the fact that "spent" etching solution is heavier than fresh solution (or rather fresher solution). The spent solution containing the copper falls away from the board surface and is replaced with fresher solution from the tray. The convection currents set up provide all the agitation needed to efficiently etch a board as quick or quicker than mechanically agitating a tray with the board face up in the bottom. Other sophisicated methods such as spray etching are much faster but they are commercial techniques requiring expensive equipment. We are talking amateur, primitive techniques here for people who are both lazy and cheap.
Here is how you do it!

First, make sure that the board is flat (within a half thickness of the board material). If it is not, bend it gently until it is. Then stick a loop of a suitable tape (masking, duct, electrical or whatever you have that is water resistant) to the back of the board. Center it as best you can so that the board is balanced and hangs level when you hold the tape.

Secondly, carefully lower the board onto the surface of the etching solution. Allow one edge to touch first and then lower the rest of the board onto the surface so that air bubbles are not trapped. If the etching solution has a tendancy to climb over the board, running a greasy (very greasy) finger around the back edge of the board before placing it on the solution will help greatly to keep the board floating.

The etching solution that is in contact with exposed copper will react very quickly. At this point in the normal submerged etching technique, the dissolved copper ions would have to diffuse away (a very slow process) or be moved away by agitation in order for new, fresh solution to take its place and continue the reaction. In this technique, however, the spent etchant layer next to the copper surface becomes heavier than the surrounding fresher etchant and falls away from the board by gravity. The fresh solution takes its place and the reaction continues. As the heavier solution drops, it creates a circular convection current in the tray. The effects of this current will be noted by the fact that the first copper to be etched through will be at the edges where the freshest upwelling solution first touches the board.
There is the possibility that air bubbles will be trapped under the board. Therefore it is important that you raise the board off the surface a couple of times during the etching process, inspect the etching and then replace it. Any air bubbles left will be in different places so the exposed copper will be completely etched.
Now that was easy, wasn't it? Try it and you will wonder why you ever rocked a tray of etchant.
Back to the
Circuits Index
or
Back to
Burt's Home Page
©1998 Burton Lang - All Rights reserved. Revised:07/03/98